
Change the colour of one object
On the Color page you can change one colour or one part of the picture and leave the rest alone: turn a blue shirt red, make the sky bluer, or brighten a face. Two tools pick the part to change:
- the qualifier picks by colour (everything that is "this blue");
- a window picks by place (everything inside a circle or a rectangle).
You can use either one or both together. If you have not used the Color page yet, read Colour correct a clip first.
Add a node for the change
Fix the whole picture first (brightness and white balance) in node 01. Then do the change of one object in a node of its own, so each node does one job and you can switch it off on its own:
- Open the clip on the Color page (Shift+6).
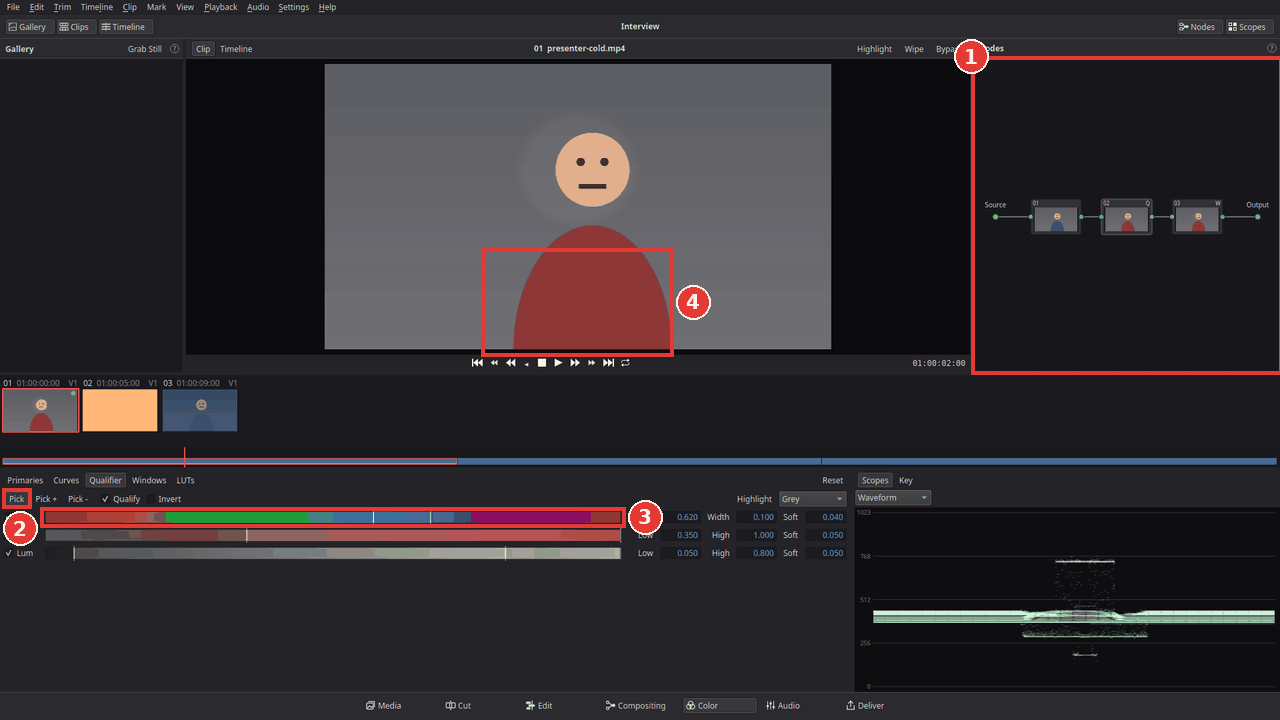
- Click node 01 in the Nodes panel (1 in the picture below).
- Press Alt+S (or choose Color > Add Serial Node, or right-click in the Nodes panel and choose Add Serial Node). Node 02 appears after node 01 and is selected. A serial node works on the picture that comes out of the node before it.
Pick the colour with the qualifier
- Click Qualifier in the bar above the palettes.
- Click Pick (2). The pointer over the viewer becomes an eyedropper.
-
In the viewer, click the object whose colour you want to change (4), or drag a small rectangle over it to pick a range of shades at once.
-
The Hue, Sat and Lum bars (3) now show the picked range: Hue is the colour, Sat how strong it is, Lum how bright. Qualify is ticked, so node 02 now changes only those colours.
-
Click Pick again when you are done, so a click in the viewer does not pick again.
Pick by RGB, luma or in 3D
The menu next to the eyedroppers sets what the qualifier selects by. HSL is the default. RGB has a Low / High / Soft range for Red, Green and Blue. Luma selects by brightness only (a good way to grade just the shadows or the sky's bright part). 3D keeps the colours you pick: Pick replaces them, Pick + adds colours, Pick - takes the neighbourhood of a colour out again; Range is how far around each colour it selects and Soft how gently it fades out.
Clean up the selection (Matte Finesse)
Turn Highlight on in black and white to see the selection. If it has specks or a harsh edge, use the Matte Finesse fields under the ranges:
-
Clean Black removes small white specks from the black area; Clean White fills small black holes in the white area.
-
Shrink / Grow: below 0 the selection shrinks, above 0 it grows.
- Denoise smooths grain in the selection.
- Blur Radius softens the edge; In / Out Ratio above 0 lets the soft edge reach into the selection, below 0 out of it.
The fields change the matte, never the colours, and the palette's Reset clears them with the qualifier.
See what is selected (Highlight)
Click Highlight above the viewer (Shift+H, 1 below). The viewer shows only the selected part in its colours and the rest grey. In the Qualifier palette, the menu next to its own Highlight button switches to Black / White: the selected part white, the rest black.
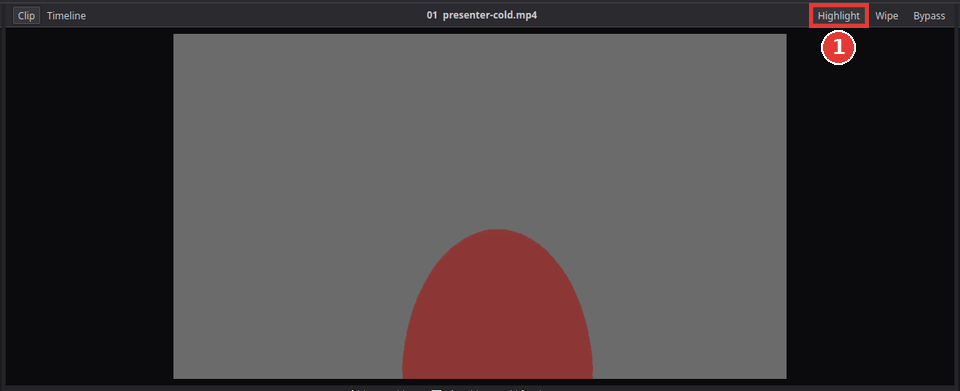
The selection is rarely perfect at the first click. To make it better:
- Click Pick + and click parts of the object that are missing (folds, shadows).
- Click Pick - and click things that should not be selected.
-
Drag the ends of the ranges on the Hue, Sat and Lum bars, or type into their fields. Soft makes the edge of the selection softer, which hides hard, noisy edges.
-
Untick Hue, Sat or Lum to ignore that one.
Click Highlight again to see the normal picture.
Change the colour
- Click Primaries in the bar above the palettes. Node 02 is still selected.
-
Drag the Hue field (1) at the bottom of the palette: the selected colour turns round the colour wheel (for example blue to red), the rest of the picture stays the same.
-
Use Sat (2) to make the colour stronger or weaker, and the wheels to make it brighter or darker.
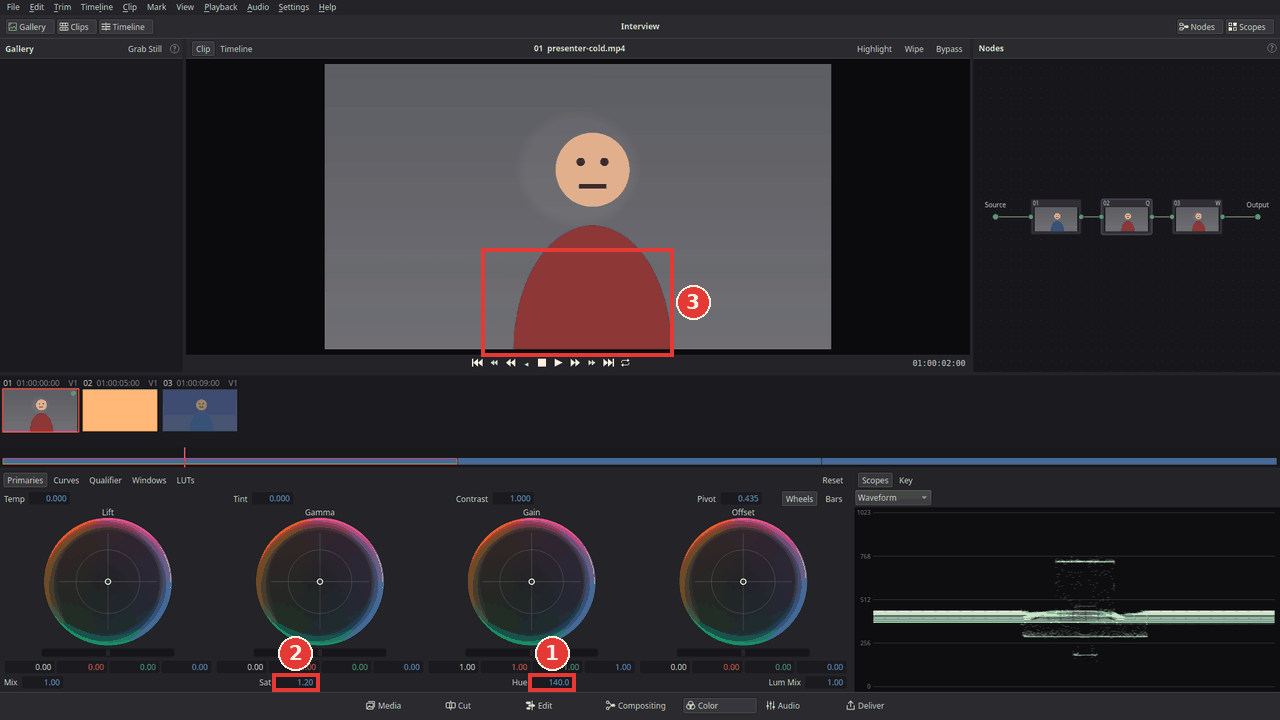
To check the change, select node 02 and press Ctrl+D to switch it off and on.
Make one colour pop: to keep one colour and turn everything else black and white, pick the colour as above, tick Invert in the Qualifier palette (now everything except that colour is selected) and set Sat in the Primaries palette to 0.
Limit it to one place with a window
Sometimes the same colour is also somewhere else in the picture (a blue car behind the blue shirt), or you want to change a place, not a colour: brighten a face, darken a bright sky. That is what windows do.
- Select the node that should get the window, or press Alt+S for a new one.
-
Click Windows in the bar above the palettes and click Circle (1). A circle appears in the viewer (2).
-
Drag inside the circle to move it over the face or object. Drag the handles on its sides to make it wider or taller, the corner handle for both, and the round knob above it to turn it.
-
Drag the small diamond on its left (or change Outside Softness, 3) to make the edge softer, so the change fades out and no edge is visible.
-
Click Primaries and make the change, for example raise Gamma a little to brighten the face. Only the inside of the circle changes.
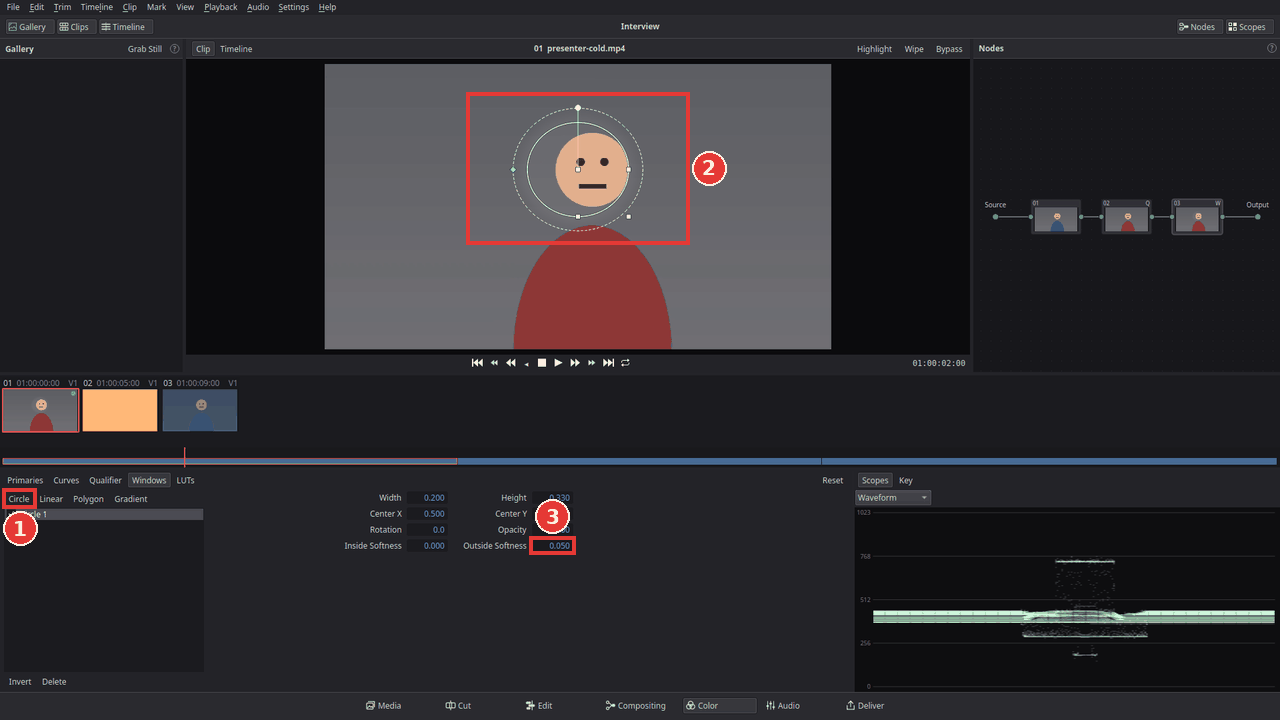
The window controls show in the viewer only while the Windows palette is shown. Other shapes are Linear (a rectangle), Polygon (drag its points; double-click an edge to add one, right-click a point to remove it) and Gradient (a soft straight edge, good for a sky). Click Invert to change everything outside the window instead.
For an odd shape, such as a person or a cloud, use Curve. It starts as a rounded shape with four points. Drag a point to move it; click a point to show its two handles and drag a handle to bend the line next to it (hold Alt to bend one side only). Double-click a point to switch it between smooth and corner, double-click the line to add a point, and right-click a point to remove it. If the shape must change during the clip (a hand moving), put the playhead on the first frame and click Key Shape, move to another frame and move the points: the shape changes smoothly between the frames. Remove Key and Clear Keys undo it.
In a node with both a qualifier and a window, only the colours you picked inside the window change. That is how you change the blue shirt but not the blue car behind it.
Blur or sharpen the window
The same window can blur part of the picture, for example a face or a licence plate:
- Draw the window as above (Circle or Polygon) on its own node.
-
Click Blur in the bar above the palettes and raise Radius. Only the inside of the window gets blurred. Click Invert on the window to blur everything except it.
-
Radius 0.5 changes nothing; below it the picture is sharpened instead. H/V Ratio blurs only one way, Scaling makes the blur larger or smaller. The Sharpen and Mist buttons at the top of the palette sharpen the picture or add a soft glow in the same way.
Make the window follow a moving face
-
Put the playhead on the first frame where the face is, and draw the window around it (a Circle works well) on its own node. Make the window a little smaller than the face.
-
Open the Tracker palette (the tab after Blur) and press Track Forward. The window follows the face to the end of the clip; the graph shows the track. Track Reverse does the same backwards from the playhead.
-
Switch on Zoom and Rotate before tracking if the face gets closer or turns (3D lets width and height change on their own). Switch off Pan or Tilt to follow only one direction.
-
Play the clip: the Blur is under the window all the time, in the viewer and in the export. If the window slips off, move the playhead there, fix the window and press Track Forward again; Frame instead of Clip tracks one frame per press. Clear Track starts over.
The Stabilizer button at the top of the palette steadies the whole clip instead (Stabilize, then Smooth, Strength and Zoom to taste).
Tips
- The node marks: nodes with a qualifier show Q, nodes with a window W.
- Undo any step with Ctrl+Z. To remove a node, select it and press Delete.
-
A window follows movement with the Tracker palette (see above). If the tracking is lost (a hand in front of the face), track up to there, place the window again and track on.
-
Other node types: Alt+P adds a parallel node (two nodes that both work on the same picture, their results mixed equally) and Alt+L a layer node (each node's change laid over the one before, the last on top). For most work, serial nodes are all you need.
If something goes wrong
-
Pick does nothing. The Qualifier palette must be shown and Pick pressed in. The pick goes to the node selected in the Nodes panel.
-
The whole picture changes, not just the object. Make sure the change is in the node with the qualifier or window (its tile shows Q or W), not in node 01.
-
The edges look noisy or hard. Raise Soft in the Qualifier palette or Outside Softness of the window, and use Pick - on the wrong parts.
-
I cannot see the window in the viewer. Click Windows in the bar above the palettes; the window controls are hidden while other palettes are shown.
Found a mistake? Edit this article on GitHub.