
Put text over a clip on the Compositing page
The Compositing page (new in Kinoklip 1.0.0 Beta) builds the picture of one clip from nodes: small boxes that each do one thing (show the clip, write a text, blur, key out green, combine two pictures) and that are joined by lines. It is the place for effects that need several layers inside one clip. As a first step, you will put a text over a clip.
For a simple title over several clips, the Text title on the Edit page is quicker; see Getting started.
Open the clip on the Compositing page
- On the Edit page, click the clip on the timeline.
- Click Compositing in the page bar at the bottom of the window (Shift+5). You can also right-click the clip and choose Open in Compositing Page.
The page has:
- two viewers at the top; the right one shows the finished picture;
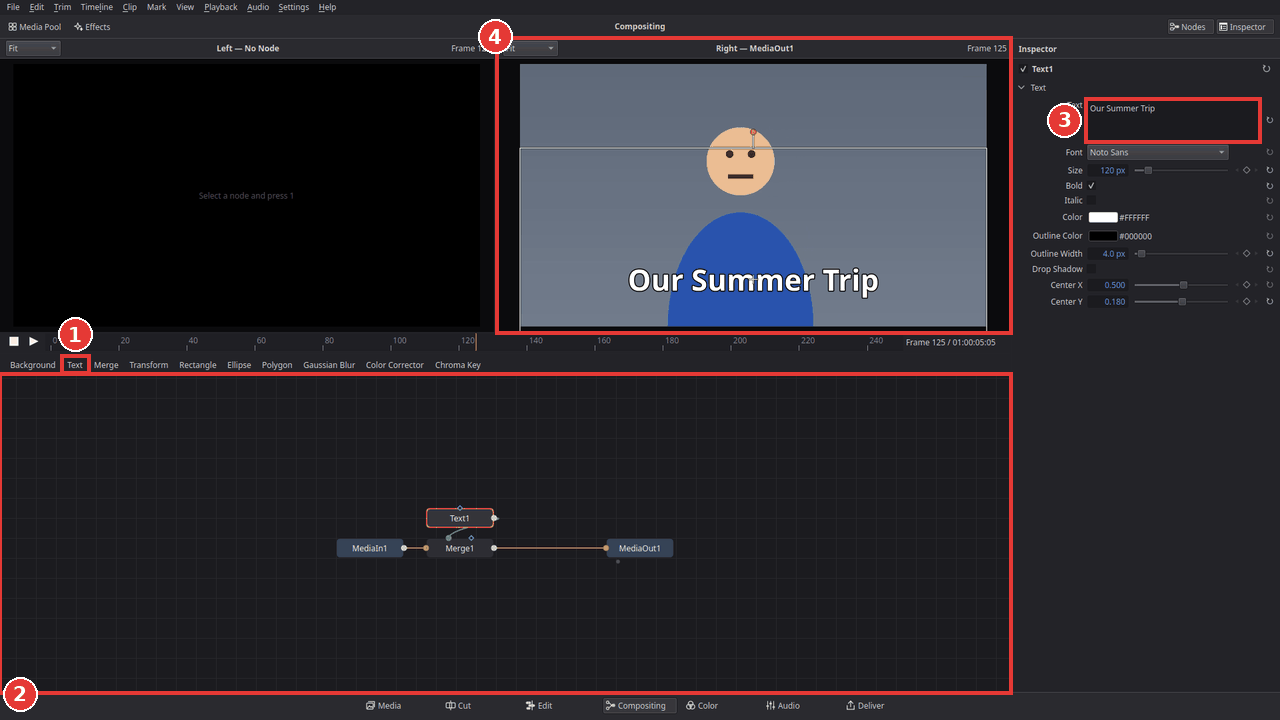
- the node editor at the bottom (2 in the picture below), with a row of buttons above it;
- the Inspector on the right, with the settings of the selected node.
At first the node editor shows two nodes joined by a line: MediaIn1 (the clip's own picture) and MediaOut1 (what comes out of the clip). Nothing has changed yet.
Add the text
- Click MediaOut1 in the node editor to select it.
-
Click Text in the row of buttons above the node editor (1). Kinoklip adds two nodes: Text1, which draws the text, and Merge1, which puts it over the clip's picture.
-
Text1 is selected. In the Inspector, type your text into Text (3).
- Change Font, Size, Color, Outline Width and Drop Shadow to taste.
- To move the text, drag it in the right viewer (4), or change Center X and Center Y in the Inspector (0.5 and 0.5 is the middle of the picture).
More ways to set the text: Layout chooses how it is placed. Frame wraps it inside a box (Frame Width and Height, with Justify and Vertical Justify), Circle sets it around a circle (Circle Radius, and Circle Angle for where it starts), and Path lets it run along a curve that you draw in the viewer: drag the points, drag a handle to bend the curve, double-click a point to make it smooth or sharp, double-click the curve to add a point, and press Delete to remove the selected point. Position on Path slides the text along the curve (give it keyframes and the text travels). Tracking, Line Spacing and Kerning (a list of numbers, one for each character) change the spacing. Element 2 to Element 4 add more fills or outlines behind the text, with their own colour, opacity and offset. The Follower values (Offset, Size, Angle, Opacity) move every character; give one of them keyframes and set Follower Delay, and the animation runs through the letters one after another. Write On Start and Write On End show only part of the text.
Go back to the Edit page (Shift+4): the clip now shows the text there too, during playback and in the export. A small node mark on the clip in the timeline shows that it has a composition.
Find your way around the node editor
-
Move a node by dragging it. Pan with the middle mouse button (or hold Space and drag); zoom with the mouse wheel; Shift+F fits all nodes into view.
-
Show a node in a viewer: select it and press 1 (left viewer) or 2 (right viewer). Handy to look at the text alone, or at the clip before the text.
-
Add other nodes: the buttons above the node editor add the most common ones after the selected node (Background, Merge, Transform, masks, Blur, Color Corrector, Chroma Key). Shift+Space opens a list of every node with a search field.
-
Turn a node off for a moment: select it and press Ctrl+P; press it again to turn it back on.
-
Delete a node: select it and press Delete. Ctrl+Z undoes every step.
-
Insert a node into a link: drag a tool from the buttons or the Nodes list onto a link, or hold Shift and drag a node that already has links onto the link; it leaves its old place and joins the new one. Shift+drag on a link pulls the link off both ends.
-
Find a node: with the node editor focused press Ctrl+F, type part of a name or type; matching nodes are selected and framed. Esc closes the field.
-
Right-click a node for Replace With (another tool with the same inputs; links and matching settings stay), Set Color and Tile Picture (a small picture of the node's result on its tile). Hover a node to see its type and key settings.
-
Copy settings between nodes: copy a node with Ctrl+C, select another node of the same type and press Ctrl+Shift+V.
Spline and Keyframes panels
Click Spline (or Keyframes) in the bar at the top of the page, next to Nodes. The panel opens beside the node editor and lists the animated parameters of the selected nodes, node by node, with a check box for each curve. Sel switches between the selected nodes and every node; All and None show or hide all curves; Show All also lists the parameters you have not animated yet.
Select keyframes with a click or a rubber band and use the tools above the curves: Smooth (S), Linear (L), Step In (I), Step Out (the Static button, O), Ease In and Out (T), Flat, Reverse (V) and Time Stretch. F fits all curves to the panel. The T and V boxes type an exact frame and value for the selected keyframe.
To repeat an animation, click Loop: after the last keyframe the value repeats the keyed range (a dashed curve shows the repeats). Its arrow offers Set Ping-Pong, Set Relative (each repeat continues from where the last ended, for a turning angle), Linear Extrapolation, Remove Loop and the Pre-Loop versions for before the first keyframe. The panel is small on purpose: widen it by dragging the line between it and the node editor, and use the » button when the tool row does not fit.
Merge and Transform controls
Select a Merge or Transform node to see these in the Inspector.
-
Apply Mode has 33 modes (Normal, Screen, Multiply, Overlay, Soft Light, Hard Light, Color Dodge, Color Burn, Hue, Saturation, Color, Luminosity, Divide, Average, Negation, and more). With Normal, Operator chooses Over (the default), In (the foreground only where the background has picture), Held Out (only where it has none), Atop (the foreground only on the background's picture, the background kept) or XOr.
-
Blend fades the whole foreground. Alpha Gain fades only its transparency: lowering it makes the foreground add light instead of covering. Subtractive / Additive at 0 covers the background as usual; at 1 the background stays at full strength beneath the foreground (for glows and fire). Burn In brings the covering back as you move towards Additive.
-
Center, Pivot, Size, Angle and Flip place the foreground. The pivot is the point it turns and scales about (0.5, 0.5 is the middle). Invert Transform applies the opposite move. Use Frame Format Settings off lets you give a Reference Width / Height: the foreground is first stretched to that size.
-
Edges (Merge and Transform): what shows where the moved picture does not reach the edges of the frame. Canvas shows nothing, Wrap repeats the picture, Duplicate stretches the border pixels, Mirror mirrors the picture.
-
Filter Method: how the picture is resampled when it is moved or scaled. Linear is the default; Cubic, Catmull-Rom, Mitchell and Lanczos are sharper, Gaussian is softer, Nearest Neighbor keeps hard pixels.
All numbers here can be keyframed with the diamond next to them.
Viewer tools
Each viewer has a row of buttons under its title (the ones that do not fit are in the » menu). The keys below work only while that viewer has the focus (click into it first), so they never get in the way of keys like I and O elsewhere.
-
A, B and A|B (keys , . and /): the viewer has two buffers. Buffer A shows the node you sent with 1 / 2. Press . to switch to buffer B (it starts as a copy of A), then send another node with 1 / 2 or drag one in: it goes into B and A keeps its node. / shows both at once with a split line; drag the dot to move the line, drag the line itself to turn it (hold Shift for steps of 45 degrees).
-
Color, Red, Green, Blue, Alpha (keys C, R, G, B, A): show one channel of the picture as grey. Checker shows a checker pattern under the picture so you can see which parts are transparent. These need a saved composition (make one edit first).
-
Controls (Ctrl+K): hide or show the handles over the picture.
- Lock (Ctrl+L): the viewer keeps its node when you press 1 / 2 for another.
- Clear (~): empties both viewers.
- 100% (Ctrl+1): shows the picture at its real size.
- Loop (next to Play): click to change what happens at the end of the clip: Loop, Ping-pong (plays forward and backward) or Once (stops on the last frame).
More viewer tools
-
Onion Skin (O): shows the frames before the current one in blue and the frames after it in orange over the picture, so you can see how something moves. Onion: 1 on the tool bar chooses how many frames on each side (1 to 3).
-
ROI: shows only a rectangle of the picture. Drag over the picture to draw it, drag inside to move it, drag its corners to resize it and double-click to show everything again.
-
Rulers and Safe Area are the same as View > Show Rulers and View > Safe Area, here on the viewer's tool bar.
- HiQ, MB, Prx, APrx and Cache beside the transport only change what the two viewers show; the Edit page, playback of the timeline and export always render at full quality. HiQ off shows a faster draft, MB off hides motion blur, Prx renders a smaller picture (1:2 or 1:4, the button beside it), APrx does that only while the clip plays or you change something, and Cache keeps the viewers' pictures on the disk so going back over a frame or looping the clip shows them at once.
Settings on every node
Every node except the masks and MediaOut has a Settings section under its parameters (collapsed until you open it):
-
Blend mixes between the node's input and its result: 1 is the full effect, 0 shows the input untouched. (Merge keeps its own Blend in the main list.)
-
Process Red, Green, Blue, Alpha: a channel you turn off is taken from the node's input instead of its result.
-
Apply Mask Inverted: the Effect Mask works the other way round, so the effect applies outside the shape.
-
Multiply By Mask: instead of limiting the effect, the result is multiplied by the mask, so everything outside the mask becomes transparent.
-
Process When Blend Is 0.0: with it off, a node whose Blend is 0 is skipped completely.
Blend can be keyframed; the check boxes cannot.
Motion Blur is in the Settings of Merge and Transform nodes. Turn it on and a moving or turning picture is smeared along its path, as a camera with a shutter would see it. The node is drawn several times, a little earlier and later than the frame, and the pictures are averaged.
-
Quality is the number of samples on each side of the frame: 2 gives five pictures. Use more for fast movement.
-
Shutter Angle is how long the shutter stays open: 360 is one whole frame, the default 100 a little more than a quarter of a frame. 0 gives no blur.
-
Center Bias moves the shutter in time: 0 is centred on the frame, -1 ends at the frame (a trail behind the picture), 1 starts at it.
-
Sample Spread is how much each picture counts: 1 counts all equally, less gives the middle of the shutter more weight, more gives the ends more weight.
Quality, Shutter Angle, Center Bias and Sample Spread can be keyframed. A picture that does not move looks the same with Motion Blur on or off.
Masks, keyers and the Corner Positioner
-
Rectangle: Corner Radius rounds the corners (1 is a pill). Level fades the whole mask and Paint Mode says how the mask joins the mask plugged into it: Merge (the union), Add, Subtract, Minimum, Maximum, Multiply, Replace, Invert, Copy or Ignore. Every mask node has Level and Paint Mode.
-
B-Spline: like Polygon, but the points pull a smooth curve instead of being corners. Drag a point in the viewer to move it; turn the mouse wheel over a point to make it pull harder or softer (its weight). Keyframing the points animates the whole shape.
-
Luma Keyer (Matte): keeps the pixels whose Luminance (or Red, Green, Blue, Alpha) lies between Low and High, with a Soft Range fade at both ends. Invert keeps the rest.
-
Delta Keyer (Matte): pick the screen colour in Background Color, then raise Gain until the screen is gone. Balance weights the two other channels, Pre-Matte Soft Range softens the edge, Clean Background and Clean Foreground push the matte to fully out or fully in, Matte Threshold Low / High set the final range, and Despill removes the screen colour from the edges. For a harder shot: Pre-Matte Blur and Erode smooth the screen before the key, the Matte controls (Blur, Erode / Dilate, Gamma, Restore Fringe) clean the edge, the Fringe controls correct the colour of the semi-transparent edge, and Replace Mode paints it. Connect masks to Garbage Matte (cut out what is not screen) and Solid Matte (keep what must stay); connect a picture of the empty screen to Clean Plate to key out uneven lighting. View Mode shows the Pre Matte or the Matte as grey.
-
Ultra Keyer (Matte): a second way to key a screen. Red / Green / Blue Level tune the difference channels, Matte Separation pushes the background out, Subtract Background removes the screen colour from the edge, and the Matte controls are the same as the Delta Keyer's.
-
Matte Control (Matte): cleans the alpha of any picture: blur it, grow or shrink it, set thresholds, bring the fringe back, and apply garbage and solid mattes.
-
Soft Glow (Filter): lights up the bright parts of the picture with a soft halo. Threshold says how bright a pixel must be to glow, Gain how strong the glow is, Glow Size how far it spreads (turn Lock X/Y off to give the two directions their own sizes), and Filter chooses the blur. Color Scale tints the glow.
-
Light Wrap (Filter): connect the keyed foreground to Input and the background picture to Background. The background's light spills over the inside of the foreground's edge so the cut-out sits in the scene; raise Intensity, then use Diffuse for how soft the wrap is and Foreground Blur for how far it reaches in. Put the result over the background with a Merge. Enable Glow lets the light also spill outside the foreground.
-
Grid Warp (Warp): drag the points of the grid in the viewer; the picture bends with them. Columns and Rows set how many points there are.
-
Displace (Warp): connect a second picture to Displace Map. Its colours move the pixels of Input: Type X / Y moves them left-right by one channel and up-down by another, Radial pushes them away from Center. X / Y Refraction say how many pixels a bright map moves them.
-
Vector Distort (Warp): like Displace, but the second picture's red and green are a vector (half grey is no movement) and Vector Range is how far a full value goes.
-
Bezier (Mask): a closed curve for cutting out an object. Drag a point to move it, drag its handles to bend the curve, double-click a point to make it smooth or sharp, double-click the curve to add a point and press Delete to remove the selected one. Turn on Roto Assist and the points snap to the nearest edge of the picture. Right-click a point and choose Follow Track to make that one point follow a Tracker or Planar Tracker.
-
Make a mask follow a moving object: track the object with a Tracker or Planar Tracker, select the mask, pick the tracker in Follow Track and tick what should follow (Position, Size, Angle, or Points to move the points of the shape instead of the mask), then press Connect. On the Edit page the same row sits in each mask's group (Track Mask) and uses a tracked Match Move effect of the clip.
-
Tracker with several patterns: set Patterns to 2, 3 or 4, pick one with Active Pattern (or click its box in the viewer), put each on a corner or edge of the moving object and track each one. The Tracker then also turns and scales the picture the way the patterns moved; Match Position, Match Rotation and Match Scale switch the parts. In Follow Track a node can take Size and Angle from such a Tracker or from a Planar Tracker.
-
Planar Tracker Track Mask: connect a mask (for example an Ellipse around a person who walks in front of the wall) to Track Mask. White parts are tracked, black parts are ignored, so things moving in front of the surface do not pull the track.
-
Corner Positioner (Transform): drag the four corners in the viewer (or type them) to pin the picture to a new quadrilateral in perspective.
Colour nodes and the Custom Tool
The Color folder of the Nodes library has more than the Color Corrector:
- Brightness Contrast: Gain, Lift, Gamma, Contrast, Brightness and Saturation, with switches for the channels they change.
- Alpha Multiply and Alpha Divide: multiply the colour by the alpha, or divide it by it (the way to colour-correct a soft edge without darkening it: Divide, correct, Multiply).
- Channel Mapper: each of red, green, blue and alpha is a mix of the four input channels. Swap red and blue by putting 1 in "Red from Blue" and "Blue from Red" and 0 in the two that were 1.
- Color Curves and Hue Curves: click in a curve to add a point and drag it. Color Curves has luminance, red, green, blue and alpha; Hue Curves changes the hue, saturation or brightness of the colours you pick with the curve (the middle line means no change).
- Custom Tool: type a formula for red, green, blue and alpha, for example
1 - r1(invert) orr1 * x(a ramp across the picture).r1 g1 b1 a1are the colours of the input,r2 ...of Image 2,xandythe position from 0 to 1,n1ton8the Number controls (they can be keyframed) andi1toi4the Intermediate formulas. Point the cursor at a field for the list of variables.
Vector Motion Blur (Filter) blurs a picture along motion vectors that you plug into Vectors (red and green, 0.5 is no motion).
Modifiers, links and formulas
Right-click the name or the number of a parameter in the Inspector:
-
Modify With puts a modifier on it. Perturb and Wiggle move the value by smooth random amounts (set the Period / Wavelength, the Strength / Amplitude and the Random Seed). Offset adds an amount, scales the value and can read it a few frames earlier or later. Expression computes the value with a formula. Cycle repeats a range of frames as a loop, a ping-pong or a relative repeat. XY Path (on a position) gives X and Y a path of their own.
-
Connect To makes the value follow another node's parameter, live. Disconnect cuts the link and keeps the value.
- Publish lists the parameter first in every Connect To menu.
The modifiers of the node get a section under its parameters, where their controls are (all of them can be keyframed, and each section has a switch and a remove button). A modified value is marked fx.
To type a formula straight into a number, double-click it and start with =, for example = sin(time / 12) * 40.
You can use time (the frame), value (what the parameter would be without the formula), n1 to n3, and other
parameters as Blur1.Size. Functions: sin, cos, tan, asin, acos, atan, atan2, sqrt, abs, pow, exp, log, log10, floor,
ceil, round, fract, sign, min, max, clamp, mix, step, smoothstep, fmod, noise, rand, deg, rad and if(test, a, b).
A formula with a mistake does nothing, and Kinoklip tells you when one would make a circle.
Groups, macros, instances and underlays
-
Group: select nodes and press Ctrl+G (or right-click > Group). The nodes get a frame with a title. Double-click the title (or Collapse Group) to fold them into one tile; links to the nodes end on the tile. Ctrl+Shift+G takes the nodes out again. Moving the group moves everything in it.
-
Macro: right-click a group > Make Macro..., name it and tick the parameters it should show (parameters you published are ticked for you). The macro's Inspector then has those controls, and they drive the nodes inside.
-
Save Macro as Title... puts the macro in the Effects Library under Titles > Macros. Double-click it there (or drag it onto the timeline) to get a clip that shows the macro's picture. Insert Macro on the node editor background puts it into the open composition.
-
Create Instance (right-click a node) makes a copy that shares the settings of the original: change the original and the instance follows. Make Independent cuts it loose.
-
Add Underlay puts a coloured box behind nodes to keep them apart visually; the nodes on it move with it.
Sound
The Compositing page plays the same sound as the Edit page: the timeline's mix, so a clip on a higher track with its own audio is heard over your clip's sound, and muted tracks stay silent. Three controls change that on this page only:
-
Audio button (the speaker left of the transport buttons): turns the page's sound on or off. Kinoklip remembers the choice. The Edit page always plays with sound.
-
Audio (select the MediaIn node that reads the clip's own picture, then the Audio section of the Inspector): Timeline plays the whole mix (the default); Solo this clip plays only the sound of this clip, that is the audio clips linked to it. A clip without a linked audio clip is silent.
-
Sound Offset (same section): moves the clip's sound against its picture, in frames and fractions of a frame; a positive value plays the sound later. It does not change the Edit page or the export.
Both settings are saved with the clip's composition and can be undone.
Tips
-
Fade the text in: select Merge1 and keyframe its Blend (0 at the start, 1 a second later) with the diamond in the Inspector; see Animate with keyframes.
-
Green screen in one clip: select MediaIn1 and click Chroma Key, then click Background. The new Merge puts the background in front of the keyed picture; select the Merge and press Ctrl+T to swap its inputs, so the background is behind. This does what Remove a green screen does with two tracks, inside one clip.
-
A logo picture: import the logo into the media pool first. Click Media Pool in the bar at the top of the page and drag the logo onto the node editor: a new MediaIn2 node reads it. Select MediaOut1 and click Merge, then drag from the output of MediaIn2 to the foreground input of Merge1 (foreground links are green). A shortcut: drag from the output of MediaIn2 and drop it on the output of MediaIn1; a Merge appears with MediaIn1 as the background and MediaIn2 as the foreground, and whatever read MediaIn1 now reads the Merge. Select Merge1 and lower its Size and change Center X / Center Y to put the logo in a corner. To read another picture into a MediaIn node, select it and choose the item under Source in the Inspector (This clip goes back to the clip's own picture).
-
Start over: on the Edit page, select the clip and choose Clip > Reset Composition.
If something goes wrong
-
The page says "Select a clip on the Edit page". Go back to the Edit page, click a clip on a video track (or put the playhead over one) and switch to the Compositing page again.
-
The text does not show in the right viewer. The right viewer must show MediaOut1 (its name is in the viewer's title). Select MediaOut1 and press 2.
-
Keys like Delete or Ctrl+C do nothing. Click into the node editor first; its keys only work while it has the focus.
Found a mistake? Edit this article on GitHub.