
Animate with keyframes
You will make something change over time: a slow zoom into a picture, a title that slides in, a clip that fades to half transparent. You do this with keyframes: you set a value at one moment and another value at a later moment, and Kinoklip moves smoothly between them.
As an example, here is a slow zoom in over a clip, often used to bring life into a still picture or a long interview shot.
A slow zoom in
- Click the clip on the timeline and open the Video tab of the Inspector.
- Move the playhead to where the zoom should start, for example the first frame of the clip.
-
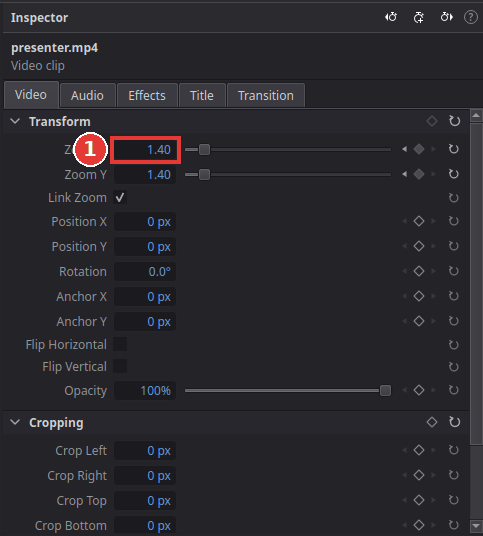
Click the small diamond at the right end of the Zoom X row (1). It turns filled: there is now a keyframe here with the current zoom (1.00).
-
Move the playhead to where the zoom should end, for example near the end of the clip.
-
Change Zoom X to 1.40 (type it, or drag left and right on the number). Because the value is now animated, Kinoklip adds a second keyframe here by itself. Link Zoom is ticked, so Zoom Y follows.
-
Press Home and Space: the picture now zooms in slowly between the two keyframes.
The same works for every row that has a diamond: Position X / Position Y to move a clip or a title across the picture, Rotation, Opacity to fade, Crop values, effect settings, the volume on the Audio tab, and so on.
Find, change and remove keyframes
-
The small arrows next to the diamond jump to the previous and next keyframe of that row. [ and ] (Clip > Previous Keyframe / Next Keyframe) jump across all of them.
-
To change a keyframe, jump to it (the diamond is filled) and change the value.
- To remove a keyframe, jump to it and click the filled diamond.
- The diamond in the title of a section (for example Transform) adds or removes keyframes for every row of that section at once.
Smooth starts and stops
By default the value changes at an even speed from one keyframe to the next, which can look mechanical. Right-click a filled diamond and choose Ease In and Out: the movement then starts slowly, speeds up and slows down again before it stops.
To make every new keyframe start that way, right-click a diamond (or a keyframe in the Keyframes panel) and choose Set as Default for New Keyframes, or pick it in Preferences > Editing > New keyframes. Keyframes you already made stay as they are.
Loop the keyframes
A value normally stays at its last keyframe's value for the rest of the clip. To make the animation repeat instead, open the Keyframes panel (Show Panel in Workspace > Keyframes), switch to Curves, and click one keyframe of the row you want (or none to loop every curve you see). Click Loop: after the last keyframe the value repeats the keyed range. The repeated part of the curve is drawn dashed and dimmed; change the original keyframes and the repeats follow.
The arrow beside Loop lists the other kinds:
- Set Ping-Pong plays the range forward, then backward, and so on.
-
Set Relative repeats the range but each repeat starts where the last one ended, so a rotation from 0 to 90 degrees keeps turning: 180, 270, ...
-
Linear Extrapolation carries on along the last segment's slope.
- Remove Loop goes back to holding the last value.
- Pre-Loop does the same before the first keyframe.
The same commands are in Clip > Keyframes > Loops and in the right-click menu of the panel. Reverse (key V in the panel) mirrors the selected keyframes in time, and Time Stretch scales their spacing around the playhead (200 % makes the movement twice as slow). The panels' T and V boxes type an exact frame and value for the selected keyframe. Each of these is one undo step. On the Compositing page the Spline panel has the same buttons for the parameters of the selected nodes.
See all keyframes on the timeline
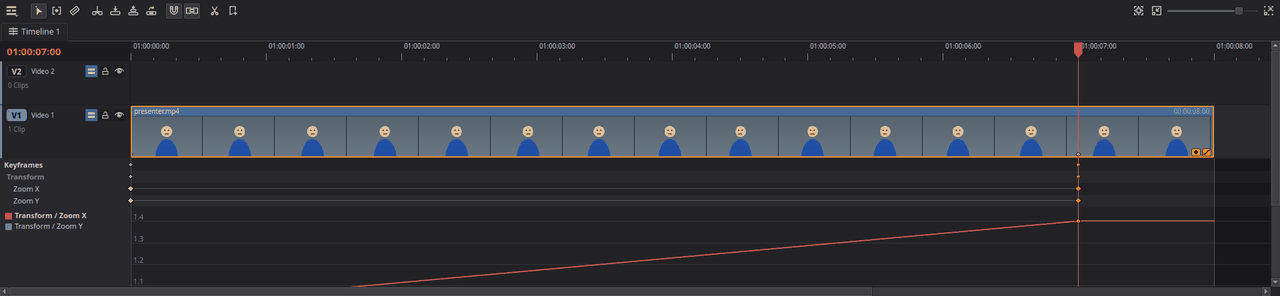
Every animated clip shows two small buttons at its bottom-right corner on the timeline. The keyframe button opens a lane under the clip with a mark for each keyframe; drag the marks to move keyframes in time. The curve button shows how the value changes between them.
Tips
-
Ken Burns effect: combine a slow zoom with a slow change of Position X, so the picture drifts while it zooms.
-
Move a title in from the side: keyframe its Position X off the screen at its start and at its final place a second later.
-
Alt+K (Clip > Add Keyframe) adds or removes a keyframe on the row you changed last.
- Keyframes belong to the clip: when you move the clip on the timeline, its animation moves with it.
If something goes wrong
-
The Loop button does nothing. A loop needs at least two keyframes on the parameter. Select a keyframe (or turn on the curves you want in the list) first.
-
The diamond is greyed out. The playhead is not over the selected clip. Move it into the clip first.
-
Changing a value changes it for the whole clip. The row has no keyframes yet. Click its diamond first.
Found a mistake? Edit this article on GitHub.