
Export a video for YouTube
You will turn your finished timeline into an MP4 file that YouTube accepts and plays in good quality. Kinoklip does not upload the video for you: you upload the file on the YouTube website afterwards.
Steps
- Save your project (Ctrl+S).
-
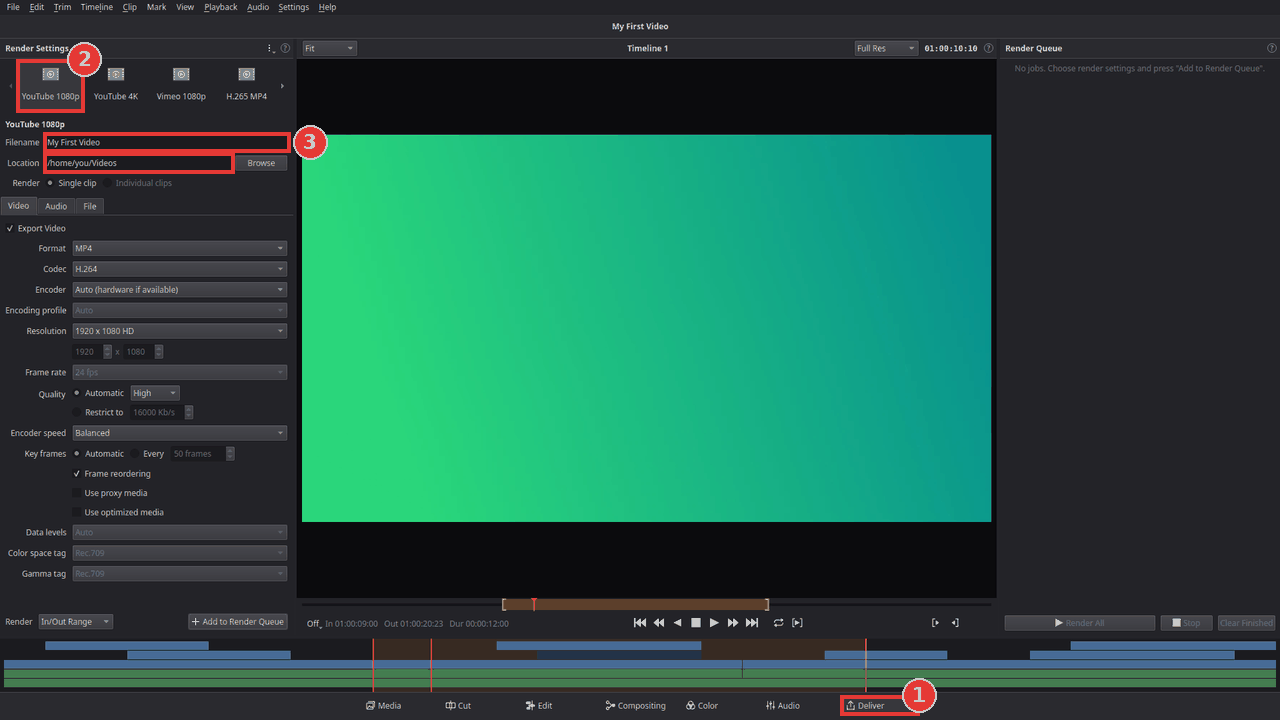
Click Deliver at the bottom of the window (1), or press Shift+8.
-
In Render Settings at the top left, click the YouTube 1080p preset (2). It sets everything YouTube needs: an MP4 file with H.264 video at 1920 x 1080 and AAC sound. If your footage is 4K, choose YouTube 4K instead (use the arrows next to the presets to see more).
-
Type a Filename (3), and next to Location click Browse to choose the folder for the file.
-
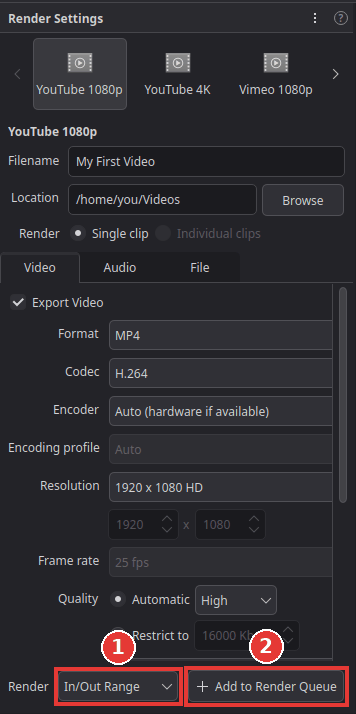
Near the bottom of Render Settings, next to Render (1 in the picture below), choose:
- Entire Timeline to export everything, or
- In/Out Range to export only the part between your in and out marks. You set those on the Edit page: move the playhead and press I for the start and O for the end.
-
Click Add to Render Queue (2). Your export appears as a job in the Render Queue on the right.
-
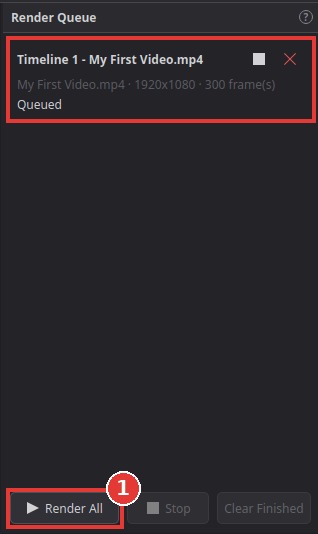
Click Render All.
-
Wait until the job says it is done. The bar shows how far it is and how long it still takes. Click the folder button on the job to open the folder with your video.
-
Upload the file on YouTube (on the YouTube website: Create > Upload video).
Tips
-
You can keep working while it renders. The job takes a copy of the timeline when you add it, so later changes do not end up in this export.
-
Hardware encoding makes exports faster on many computers. Encoder on the Video tab is set to Auto (hardware if available), so Kinoklip uses your graphics chip when it can.
-
Better quality or a smaller file: on the Video tab, Quality sets how good the picture is. High is a good choice for YouTube; Best gives a bigger file.
-
Frame rate: the video is exported at the frame rate of your timeline. To change it, use File > Project Settings (Shift+9) before you start editing.
-
Only the sound: the Audio MP3 or Audio WAV presets export just the audio.
One file for every clip
To get each clip of the timeline as its own video file (for a client, or to import them in another program), choose Individual clips next to Render on the Deliver page, instead of Single clip.
-
The files go to the Location folder. The Filename box is not used: Filename uses picks the names, Clip name, Source name (the name of the media file) or Number + clip name (001_, 002_ ... in timeline order). Two clips with the same name get _2, _3.
-
Handles adds that many extra frames before and after every clip, so the editor who gets the files can still adjust the cuts. The extra frames show what the timeline has around the clip, and stop at the start and end of the timeline.
-
Where clips lie over each other, the one on top is the clip. Gaps give no file.
- In/Out Range works too: only clips inside it are rendered, cut at its edges.
- Add to Render Queue adds one job for every clip, so the queue shows how far each clip is.
If something goes wrong
-
"Nothing to render: the timeline is empty." Put some clips on the timeline first, on the Edit page.
-
"... already exists. Overwrite it when the job renders?" A file with that name is already in the folder. Click No and change the Filename, or Yes to replace the old file.
-
The video is too short or too long. Check Render: with In/Out Range only the marked part is exported. Choose Entire Timeline to export everything.
-
The export failed. The job shows the reason. Often the folder cannot be written to, or the disk is full: choose another Location and add the job again. (If a hardware encoder fails, Kinoklip already switches to the normal software encoder by itself.)
Found a mistake? Edit this article on GitHub.