
Colour correct a clip
A shot that came out too dark, too blue or too yellow can be fixed on the Color page (new in Kinoklip 1.1.0 Beta). This article shows the basics: making a clip brighter or darker, taking out a colour cast, checking the result on the waveform, comparing with the original and giving other clips the same correction.
What you do on the Color page is called the clip's grade. It stays with the clip: it plays on the Edit page and is part of the exported video.
Open the Color page
- On the Edit page, put the playhead over the clip you want to correct.
- Click Color in the page bar at the bottom of the window (Shift+6, 1 in the picture below).
The Color page always works on the clip under the playhead (on the highest video track that has a clip there). To correct another clip, click it in the clips strip, or move the playhead.
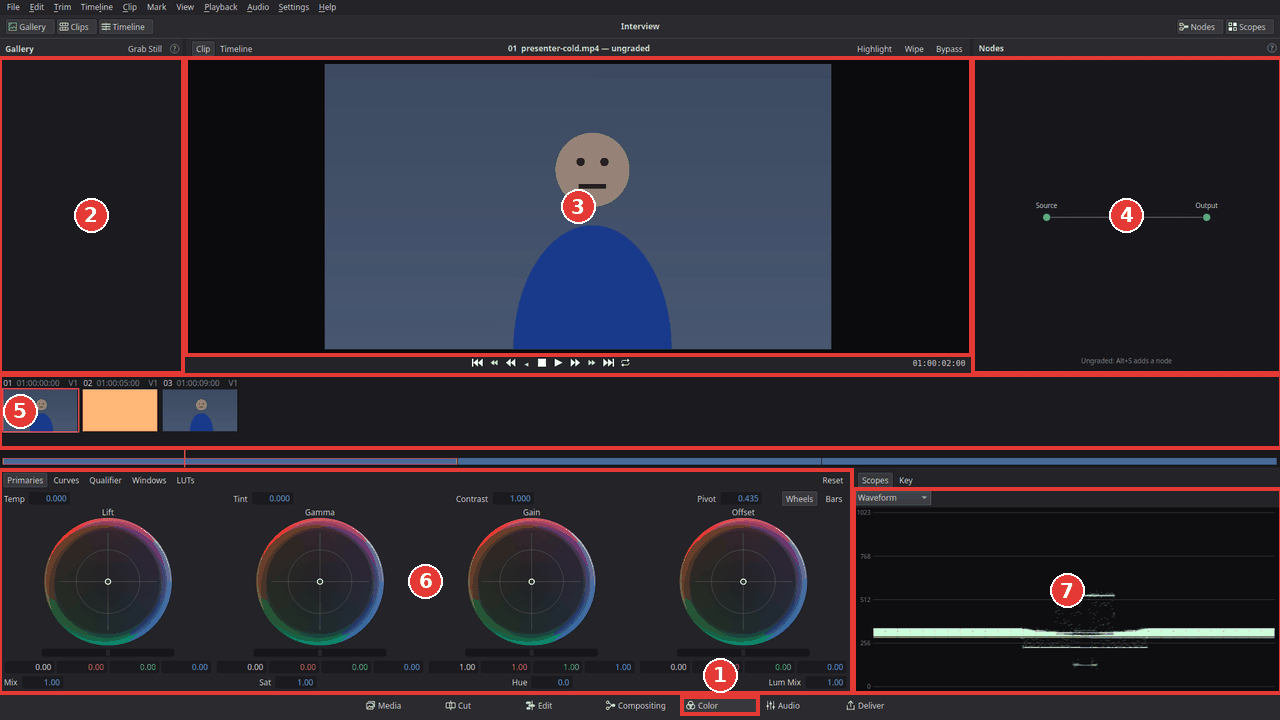
The page has:
- the Gallery (2) on the left, which keeps saved grades ("stills");
-
the viewer (3) in the middle, which shows the clip with its grade. The bar above the picture shows the clip's number and name;
-
the Nodes panel (4) on the right. Every correction lives in a node (a numbered box). A clip that is not corrected yet has no nodes; you do not need to add one first, the first change you make creates node 01;
-
the clips strip (5): every clip of the timeline as a small picture, numbered in order. The clip you are correcting has a frame around it. Under it is a small timeline where you can click to move the playhead;
-
the palettes (6) at the bottom: Primaries, Curves, Qualifier, Windows and LUTs. Click a name to show that palette;
-
the scopes (7) at the bottom right, which measure the picture (see Read the waveform).
Fix the brightness
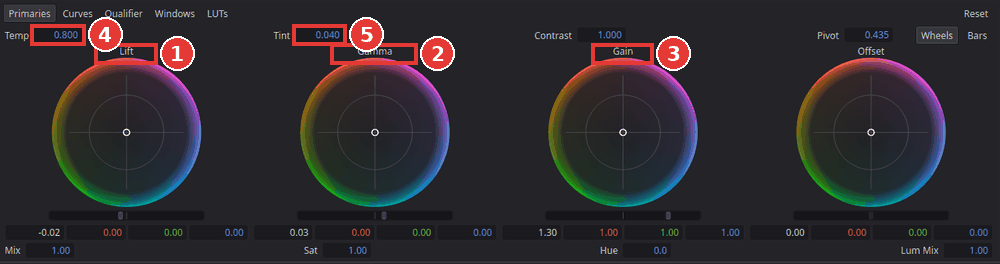
The Primaries palette has four colour wheels. Each wheel has a ring with a dot in the middle (for colour) and a bar under the ring (for brightness):
- Lift (1) changes the dark parts of the picture (shadows);
- Gamma (2) changes the middle tones (faces, walls, most of a normal picture);
- Gain (3) changes the bright parts (highlights, the sky);
- Offset moves everything at once.
To make a dark clip brighter:
- Click Primaries in the bar above the palettes (it is shown when the page opens).
-
Drag the bar under Gain to the right until the brightest parts look bright but not washed out. Drag it to the left to make them darker.
-
If the picture now looks flat, drag the bar under Lift a little to the left so the darkest parts are black again.
-
Drag the bar under Gamma to brighten or darken the middle tones, for example faces.
Small changes go a long way. Hold Shift while you drag for fine control. To type a value instead, double-click one of the numbers under a wheel (Y is brightness, R, G and B are the colours). Double-click a wheel to set it back to neutral; double-click the bar under it to reset only the brightness.
Fix the colour (white balance)
A picture that looks too blue (often indoors or in the shade) or too orange (light bulbs) has a colour cast. Things that should be white or grey show the cast best.
-
Find Temp (4) above the wheels. Drag the number to the right to make the picture warmer (more orange, less blue), to the left to make it cooler.
-
If the picture still looks a little green or pink, drag Tint (5): to the right takes green out (adds magenta), to the left adds green.
-
For a finer fix, drag the dot in the middle of a wheel towards the colour you want more of. It moves the colour of that part of the picture without changing its brightness: drag the Gain dot away from blue if only the bright parts are blue, the Lift dot if only the shadows are.
Look at something that should be neutral, such as a white wall, a grey road or a white shirt: when it looks neutral, the cast is gone.
The other fields of the palette: Contrast makes darks darker and brights brighter at the same time (Pivot is the brightness that stays put); Sat makes all colours stronger or weaker (0 is black and white); Hue turns every colour round the colour wheel; Mix fades the whole node in and out.
Read the waveform
The eye gets used to a colour cast within seconds, and every monitor shows colours a little differently. The scopes at the bottom right measure the picture instead.
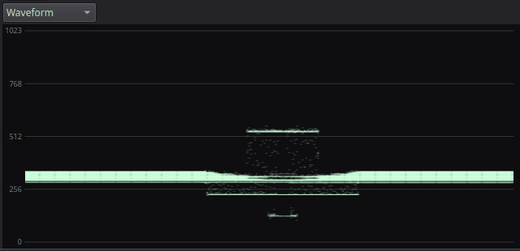
The Waveform draws the picture from left to right as it is in the viewer, but upwards it shows brightness: the bottom line (0) is black, the top line (1023) is pure white.
| Before | After |
|---|---|
 |
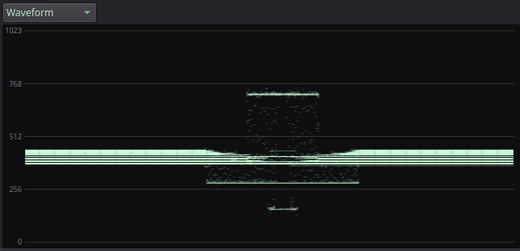 |
- Too dark: the trace sits low and nothing comes near the top. Raise Gain.
-
Too bright, or "clipped": the trace is pressed flat against the top line. The detail there is lost; lower Gain.
-
Grey and flat: the trace sits in a narrow band in the middle. Lower Lift and raise Gain, or raise Contrast.
A normal picture has its darkest parts near the bottom and its brightest parts somewhat below the top.
To check the colour, choose Parade in the menu at the top of the scope. It shows the red, green and blue parts of the picture side by side. Where the picture shows something white or grey, the three should be at the same height; if the blue one is higher, the picture is too blue there.
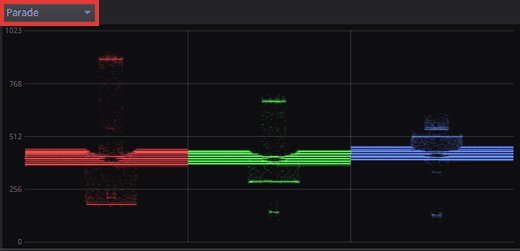
The menu also has Waveform RGB, a Vectorscope (how strong the colours are and which way they lean) and a Histogram. To see two scopes in a separate window on any page, choose View > Show Panel in Workspace > Video Scopes (Ctrl+Shift+W).
Compare with the original
Click Bypass above the viewer (Shift+D) to see the clip without its grade; click it again to see the grade. The bar above the picture says "grades bypassed" while it is on. Bypass only changes what the viewers show: the export always has the grades.

To switch off just one node, select it in the Nodes panel and press Ctrl+D (press it again to switch it back on).
Give other clips the same correction
Clips from the same camera and place usually need the same fix. There are three ways to copy it.
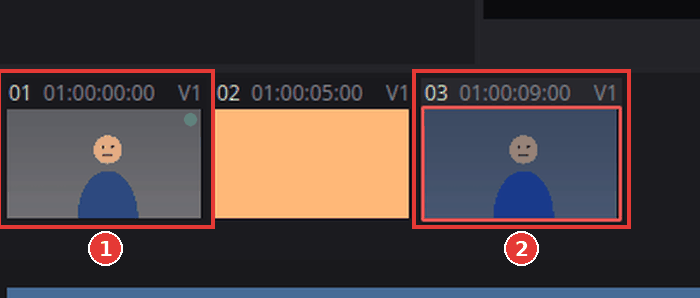
Copy and paste:
- In the clips strip, click the corrected clip (1 in the picture above) and press Ctrl+C.
-
Click the clip that should get the same correction (2). To give it to several clips at once, hold Ctrl and click each of them.
-
Press Ctrl+V.
Middle-click: click the clip that should get the correction, then click the corrected clip with the middle mouse button (the mouse wheel). The selected clips get its grade.
Gallery stills keep a grade for later, even after you have changed the clip again:
-
Click the corrected clip, then click Grab Still in the Gallery's title bar (Ctrl+Alt+G, 1 below). A small picture with the grade appears in the Gallery (2).
-
Click another clip in the clips strip and double-click the still (or middle-click it). The clip gets that grade.
-
Right-click a still for more: Apply Grade to Selected Clips, Wipe with This Still (compare the current clip with the still side by side; drag the line in the viewer), Rename… and Delete Still.
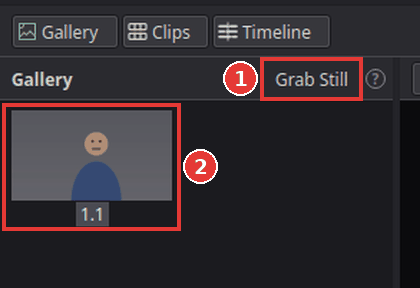
Stills are saved with the project.
Tips
-
Start over: choose Color > Reset Node Grade to reset the selected node, or Color > Reset Clip Grade to remove the whole grade of the clip. Ctrl+Z undoes every step.
-
One look for the whole video: click Timeline above the viewer (left of the clip name) to grade the whole timeline. That grade comes after the clips' own grades, so it is the place for a final look; click Clip to go back to the clip.
-
Curves: the Curves palette shapes brightness more freely: click the line to add a point and drag it (a gentle "S" adds contrast). Double-click or right-click a point to remove it.
-
Fix one part of the picture only: see Change the colour of one object.
-
A ready-made look: see Use a LUT.
If something goes wrong
-
The viewer says "No clip under the playhead". Move the playhead over a clip: click in the small timeline under the clips strip, or click a clip in the strip.
-
The wrong clip changes. The Color page corrects the clip with the frame around it in the clips strip, which is the top clip under the playhead. A title or a picture-in-picture on a higher track is graded instead of the clip under it; click the clip you want in the strip.
-
Keys such as Ctrl+C or Ctrl+D do nothing. Click an empty part of the Color page first, outside the number fields: while a field is being typed in, it keeps the keys.
-
The colours look right in Kinoklip but different on another screen. Trust the scopes more than your eyes, and check on a second screen or a phone before exporting.
Found a mistake? Edit this article on GitHub.