
Make a vertical video for Shorts, Reels and TikTok
You will make an upright video in the 9:16 format that YouTube Shorts, Instagram Reels and TikTok use: 1080 pixels wide and 1920 pixels high. Two settings matter, and people often change only one of them:
- the timeline resolution: the shape of the picture you edit in, and
- the render resolution on the Deliver page: the size of the file you export.
Both must be 1080 x 1920.
1. Make the timeline vertical
Best do this at the start, before you edit.
- Choose File > Project Settings (Shift+9).
-
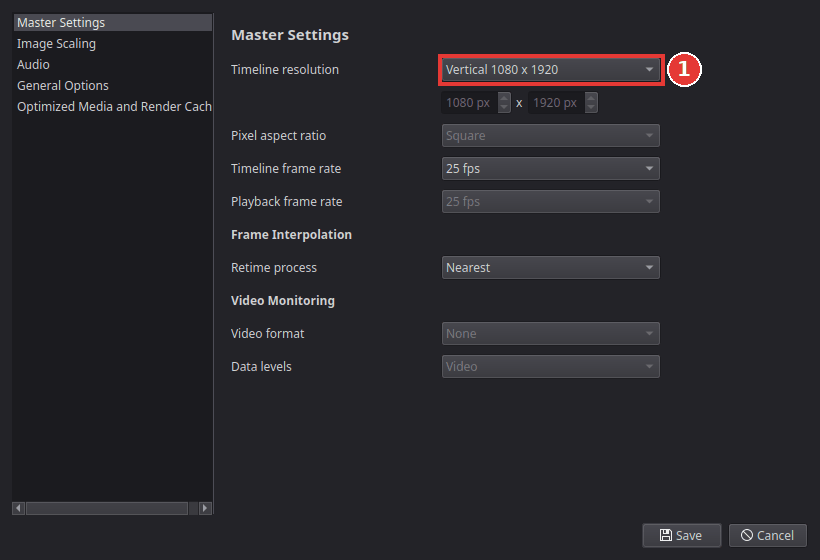
In Master Settings, set Timeline resolution to Vertical 1080 x 1920 (1).
-
Click Save. The viewer now shows a tall, narrow picture.
2. Fill the frame
Most clips are filmed in landscape. In a vertical timeline Kinoklip shows the whole of such a clip, so it appears as a small strip in the middle with black above and below. To fill the frame:
- Click the clip on the timeline.
-
On the Video tab of the Inspector, under Transform, raise Zoom X until the picture fills the height (1). For a 16:9 clip that is about 3.16.
-
The sides are now cut off. Change Position X (2) to choose which part of the picture is seen, for example to keep the person in the middle.
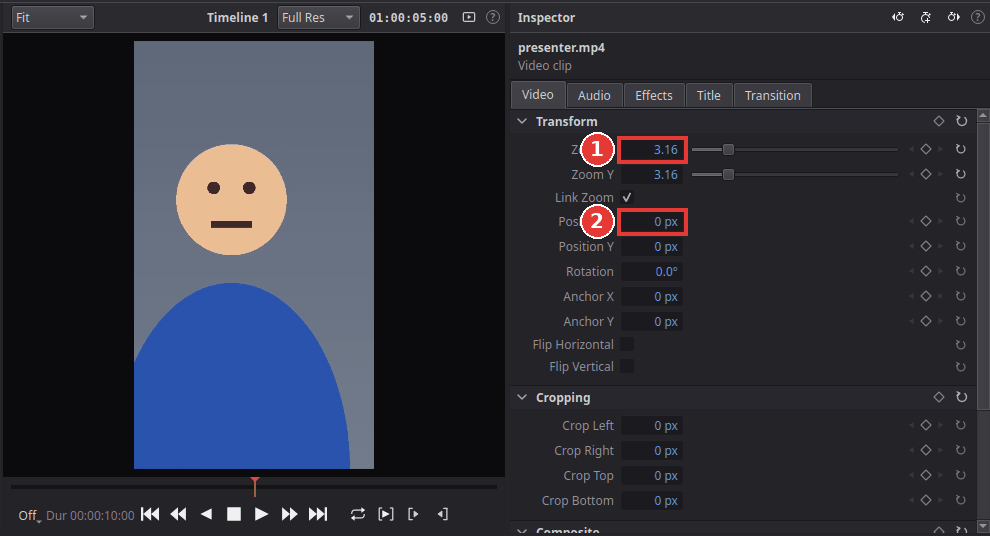
Clips filmed upright on a phone already fill the frame; leave their Zoom X at 1.00.
If the subject moves from one side to the other during the clip, animate Position X with keyframes; see Animate with keyframes.
3. Export it upright
- Go to the Deliver page (Shift+8) and choose a preset, for example YouTube 1080p.
-
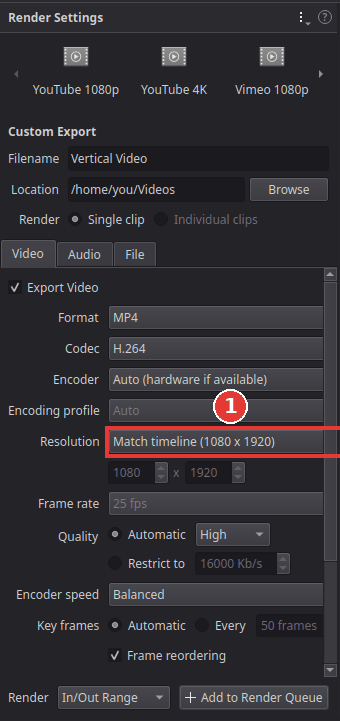
On the Video tab, set Resolution to Match timeline (1080 x 1920) (1). The YouTube preset sets 1920 x 1080 (landscape), which would put your upright video into a wide frame with black bars at the sides.
-
Enter a file name, click Add to Render Queue and then Render All.
Tips
-
Titles and captions: keep text away from the top and bottom edges and from the right side; the apps put their buttons and the video's description there.
-
A vertical and a landscape version of the same video: keep the project landscape and make a second timeline (File > New Timeline, Ctrl+N) for the vertical version. Right-click its tab, choose Timeline Settings, untick Use project settings and enter 1080 x 1920. Copy the clips into it and reframe them there.
-
See the vertical frame on a landscape timeline: View > Viewer Overlays > Safe Area > 9:16 (Vertical Video) draws the upright area over the viewer.
If something goes wrong
-
The exported video is landscape with black bars at the sides. The render Resolution was still 1920 x 1080; set it to Match timeline and render again.
-
The picture is small with black bars above and below. Raise Zoom X of the clip (step 2).
- The picture looks blurry after zooming. Zooming enlarges the pixels. Footage filmed in 4K, or filmed upright, stays sharp.
Found a mistake? Edit this article on GitHub.